Monday, January 31, 2011

Tone on Tone

I saw THIS card on Kim Hughs' blog.  Her card was inspired by Regina's card as you will see on Kim's post.                                                              I loved the tone on tone and it happens to be one of my favorite layouts so I had to create my own version.  But I couldn't stop at one ... and ended up with 3 quite different versions.
I decided to make my squares smaller and use butterflies (Martha Stewart) and leaves (Punch a Bunch).  The buttons on the butterfly card are from BasicGrey.  The yellow was a bit too bright but a bit of Copic marker colored on it made it the perfect match.  The sentiment comes from Around & About Sentiments (Papertrey Ink) which I can't seem to stop using!!  I even inked up just bits of it to add on this first card.  I've also used the stripes from the Background Basics :Retro (Papertrey Ink) and some text for the leaves (Background Basics: Text Style - Papertrey Ink) on this first card.
Thanks for dropping by my little blogging corner of the world.  Enjoy your day!
Donelda

Saturday, January 29, 2011

Challenge with Linda #1

Hello everyone!  Today is an exciting day. 

My blogging friend Linda and I decided to have a little fun on our blogs.  You see, I met Linda in a Secret Sister swap over at SCS.  I was her "big sister" and got to send her a whole bunch of fun things to play with.  Becuase of that, I knew that Linda and I had a number of similar images.  So, I asked her if she would like to have some fun on our blogs, creating cards with the same images.  I LOVE doing this becuase I find it fascinating that you can use the same images and get such different cards.

Now, when you go and visit Linda's blog you will see that she makes the most beautiful layered cards.  She is an expert at coloring with copics and she always uses great colors, beautiful designer paper, and embellishments.  That is quite a bit different from my typical style.  So today, I decided to try to be like Linda :-) and yet keep to my more clean and simple style.

The image (Hero Arts) is colored with Copics.  I added some designer paper (Bitty Dots in Spring Rain, Papertrey Ink) behind my image.  The bottom is some Spring Rain cardstock with some stripes added using my Versamark pen and a ruler.  You might remember I did this HERE a little while ago.  The sentiment is from Mixed Messages (Papertrey Ink).  I attached the image with dimensional tape and actually tilted it a bit for some fun.  A bit of ribbon, a button and a pink gem in the girls hair and my card is finished. 

Now, off to see what Linda created using this image.  I can hardly wait to see what she did!!   Drop back by next week because we have planned to do this again next week!!

Thanks for dropping in!
Donelda

Thursday, January 27, 2011

One Layer Wednesday (OLW) 38 - Sketch Challenge

Edited: oops, that's right, it is actually Jennifer who handed out the actual challenge this week and she created the sketch herself!!  Sorry Jennifer for making this mistake!!

Susan R. gave us a sketch to use for this week's one layer wednesday challenge #38.  That is quite different!  I saw her card and wanted to use a silhouette flower and the bee.  You can't really see it in the photo but the flowers have a nice shimmer to them.  That is because I sprayed the inked up stamp with some water mixed with Perfect Pearls (Ranger) - one of Jennifer McGuire's favorite techniques! 

Flower and bee from smARTwork stamps, sentiment is from Papertrey Ink

Thanks for dropping by. 
Donelda

Wednesday, January 26, 2011

Crafting Fun!

Hi everyone!!

I just wanted to drop in and let you know about a little fun you can find here on the blog come Saturday!  My blogging friend LINDA and I decided that it would be fun to create cards using the same image.  I just love doing this because it is fun to see how different cards end up looking even though we use the same image.  So, make sure you come back on Saturday to see what we create!!

Donelda

Spread Your Purple Wings

I have one package of 8x8 Memory Box paper (aerial) ... and I love it ... I hoard it (snort, like you didn't know that). 

So, as I try to use up my "scraps" I realized that I have a bunch of small strips of this memory box paper that I can't throw away (it's a sickness!).  So, I decided to use it to create an interesting border along the bottom of this card. I also used a piece to cut the scallop border along the bottom of the solid piece of dp. 

The bird is stamped with Lavender ink (SU!) and comes from the old Carte Postale stamp set. It is actually stamped onto another piece of this Memory Box paper ... makes the whole card go together well!!   The sentiment is from Birds of a Feather set (Papertrey Ink). 

Okay, so tell the truth ... do you suffer from this sickness as well???  Can you not bare to throw away the tiniest piece of designer paper????   LOL!!! !

Donelda

Tuesday, January 25, 2011

Clean and Simple Friend

This is one of those cards that I made weeks and weeks and weeks ago for some challenge but never got it uploaded in time. 

It was also poorly lit and the result is that you can barely tell that hte flowers and swish are Raspberry Fizz (Papertrey Ink).  The flowers are from In Bloom and the swirl is from Fancy Flourishes (both Papertrey Ink).  On top of the letter i is a very small rhinstone .. just to make it interesting!!

Hope you have a fantastic day!
Donelda

Sunday, January 23, 2011

Travel Moos

So Carole over at Make a Moo or Two presented a new Moo challenge.  This time the theme is TRAVEL!  A friend of mine sold me this Fiskers travel clear stamp set for just a few dollars.  I knew it would be perfect for this challenge.  Some stamping and a little sponging was the ticket!

(Swirls are from Stampology, sentiments are from Papertrey Ink)

Thanks for dropping in tonight.

Donelda

Celebrate

Sorry I've been a bit slack at posting this week.  No good excuse, just not "on it" this week!

I continue to try to use up backgrounds and scraps as much as I can.  And I am making a small dent in my very large pile!! 

This card started out with that "sky-like" background.  I while ago I had been playing around with some Brilliant Blue and Real Red reinkers (SU!).  After I was finished with the project I had been working on, there was lots of blue and a bit of the red ink left on my craft sheet.  So, I spritzed a piece of watercolor paper and using my aqua brush, added the last of the ink to the paper.  This was the result.  Notice how the red actually turned out pink. 

Then, I decided to use this pink bird.  She was a left over from using the computer 'decals' that I used on THESE cards (see, trying hard to use stuff up!) and went with the pink "sky" so well.  I added the bird to a die cut shape (Labels 1 - Spellbinders) and the rhinstones which were also part of the computer decal sheet I found at the Dollar Store.  Once that was done, I wanted to add a place at the bottom to include the sentiment.  I found some scrap pink cardstock that matched well and using my Versamark pen and a ruler, drew lines every quarter inch.  I love that effect, so subtle!!  The sentiment is from Round & Round (Papertrey Ink 2010 Anniversary set) in Night of Navy (SU!).  Some navy ribbon tied in a bow finished the panel off nicely. 

Have a great day!
Donelda

Tuesday, January 18, 2011

Orange Teapot Get Well

  I finally got this card finished for the Hot Beverage challenge over on Gingersnap Creations blog.

Tea Pot (Tea for Two, Papertrey Ink) and Tea Cup (Everyday Classics, Papertrey Ink) were stamped with Spiced Marmalade (Distress Ink, Ranger) and cut.  I adhered them atop of a label (which is traced from a beer bottle label) with the cup up on dimensionals.

That was then adhered to the designer paper (BasicGrey).  A few orange rhinstones were adhered to eaither side of the sentiment for some bling-y-ness.

Off to see what others did with this theme.

Enjoy your day.
Donelda

Hand-made Flower

You have probably all seen the lovely hand made flower
 tutorials that are all over the blogging world.  I had wanted
 to try my hand at it but kept putting it off.  In the end I tried one like Maille Belles makes (see her tutorial at the end of THIS post). 

Mine doesn't look nearly as beautiful as those created by Maille, but it will do and it is a start.  I kept the rest of the card clean and simple to really show off the flower.  The leaves are from a punch by Martha Stewart.  The senitment is from the 2010 free anniversary gift from Papertrey Ink (Round and Round) which is bent on the block to follow the circle edge. 

 
Have you tried making these flowers yet??  If so, I'd love to see your creation.  Leave me a link!!

Donelda

Monday, January 17, 2011

Another Silhouette Moo card

So here is the card I had invisioned when I started making my recent moos (see THIS previous post).  And this is why I made 3 instead of the more typical 2. 

The fiber is Jute and the sentiment is from Simple Little Things (Papertrey Ink Anniversary set).  All ink is Distress ink (Ranger).  I'm not sure what company the dark brown cardstock is from but if you look carefully (you can click on the pic to enlarge) you will see it is woodgrain embossed.  Love it as I do not own the Papertrey Ink woodgrain embossing plate. 

Thanks for dropping in.  I promise to be finished with the moos and move on to something different now.  Thanks for being patient with me LOL!!

Donelda

Saturday, January 15, 2011

2 Challenges - OLW36 and Silhouette Moo

I was blogging around and found out that the Make a moo or two challenge site is back up and running.  I love the idea of Moos.  If you've not heard of them, they are 1.25" x 2.75" sized cardstock.  You all know how much I love my inchies and scraplings.  Well here is another size option that is just fun to play with.

So, the latest Moo challenge is Silhouettes.  I set to work one morning this week before heading out to work to make these:

I ended up making 3 (usually it is a Moo or Two).  I did the 3rd because when I started I wasn't sure of where I wanted to place the trees so I was just playing around with a third placement. Turns out I love all 3.  I started sponging Antique Linen (Distress Ink, Ranger) over the entire moo, then stamped a piece of the tree images (from Through the Trees, Papertrey Ink) with Walnut Ink (Distress Ink, Ranger).  Then I used a piece of torn paper and sponged Spiced Marmalade (Distress Ink, Ranger) to make the sunset and sponged Walnut Stain around the edges. 

Then, I was blogging one other morning before work and saw that the One Layer Wednesday challenge (OLW 36) was to use naked trees.  Well, I knew sitting down on my craft table were 3 beautiful Moos that had naked trees on them!!  Took a few seconds to pull together this card.  Of course, it is not one layer so I am not actually putting it into the link.  I keep thinking of the OLW challenges as Clean and Simple!!  Sheesh, will I never remember LOL!!! 

I have an idea of what I want to do with all 3 images so I might make another moo and create the card I can see in my mind.  I'll post it here as soon as I get it done. 

Thanks for dropping by this weekend.  I hope you have time to be creative.
Donelda

Thursday, January 13, 2011

Love Tag

I bet I made this tag more than 2 years ago!  It has sat, unused, in my bin of scrap items.  It has been patient!!  And finally, it belongs to a card which will likely get used this Valentines day.  (Note that I have edited the photo again, the original I had here was too yellow and the true colors were hard to see, this is much better.  Thank you for being patient with my lighting issues!)

The tag was made by stamping the branches and leaves (branch from Take a Bough and leaves from Beautiful Blooms - both Papertrey Ink) and then embossing them with clear embossing powder.  Then, the tag was sponged with Broken China ink (Ranger).  The hearts were cut from red cardstock and a small highlight of white added with my gel pen (Signo).  The Love sentiment is from Mixed Messages (Papertrey Ink) and popped up with dimensionals. 

The tag was added to the card by adhering the 3 strips of color (green, brown, and red) directly onto the card.  Then the tag was added with dimensions.  A bit of doodling around the edge of the card finishes it off.  


Enjoy.
Donelda

Wednesday, January 12, 2011

Recycled Birthday Card

If you follow my blog at all you will know how much I love to recycle!!  Lately, I've been on a real Kleenex box recycling kick.  There just seem to be so many great images on the boxes these days!! 

When I saw the box in our bathroom with these animals on it, I knew I'd have to create something with them.  Sometimes the hardest part is waiting for the box to get empty!!  LOL!  The animals were all nicely tucked into the colored boxes so I just had to cut them out, ink the edges and adhere them to the card.  The senitment is done with white embossing powder and comes from the Around & About Sentiments set (Papertrey Ink). 

A great card for a child's birthday!!
Have you recycled lately???? 

Donelda

Tuesday, January 11, 2011

Blogging Award

The sweet Lindsey has earned this blogger award and has kindly passed it on to me.  Isn't that so nice of her!!!  Lindsey is one of my most consistent commenters so this really means a lot to me.  She is one of those sweeties who give me feedback so I know if I am wasting my time, or perhaps being a bit of inspiration to someone out there in blogger land!! 

I'm supposed to share 8 things about myself: I'm proud to be Canadian, I was a school teacher, I am addicted to Diet Coke, my favorite color is green, I prefer cats over dogs, I played the flute in my High School band, I'm a Harry Potter fan, and one of my favorite books is A Swiftly Tilting Planet.  There you go...whether you wanted to know or not :-) LOL!!

Thanks so much Lindsey!!

Birdie Cards

These 2 cards were made using some of my smARTwork stamps.  They come from a set called Birdie Fun and were designed by Dina from Mama Dini's Stamperia ... such a great artist and card maker!  Note that the little 'Celebrate' sentiment from the green card is from Mixed Messages (Papertrey Ink).  I had seen a card somewhere with a similar bird that was outlined with grey.  It reminded me of these birds so I decided to pull them out and play!
While you can't see it in the photo, there are score marks around the white main image of the red card.  It finishes off the card nicely.  You also can't see the grey outlining the birds (on both cards) but it is there...really! The patch of grass on the second card is made with Copic markers.  The ribbon is unknown but the black button is from my Papertrey Ink black button package. 

Hope your day is going well.  Thanks for stopping by!  Leave me a comment so I know you are out there :-)
Donelda

Monday, January 10, 2011

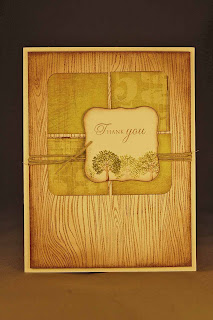
Masculine Thank You

I adore this layout.  It wasn't what I was planning to do when I started the card but, rather, came from necessity.  You see, I added the hemp to the card front and tied it before checking to see if the knot was going to be where I wanted it.  When I went to place the die cut shape in the middle of the 4 green squares, the knot was too far toward the middle!  I initially said some bad words and went to untie the knot but then placed the die cut where it is now and loved it!!! 

The little tree at the bottom of the focal image piece is from Through the Trees (Papertrey Ink).  It is a mini version of the larger tree image in the set.  I hadn't even realized it was there.  I stamped it and then did some stamping off to get the varied intensities of ink colors.  The backgound is the wonderful Woodgrain stamp by Hero Arts.  I am so glad I bought that stamp!!!  Totally worth every penny I paid for it!!

Well, another masculine card to add to my stash.  How are you doing with your masculine cards???  The more I make them the easier I find them to make. 

Thanks for dropping in!
Donelda

Saturday, January 8, 2011

One Layer Wednesday (OLW) - Yellow Flower Frame

Susan R. makes her One Layer Wednesday (OLW) challenges a real challenge.  This time the challenge was to use yellow (#35).  I had to cheat a bit with this card becuase there is a brad that holds the frame in place and I just don't like the backs of the brads showing through to the inside of the card.  So, I did add a whole other white layer onto the white card base.  I hope everyone can excuse this little oversight !!  If I wasn't so paticular ... the brads would show on the inside of a one layer card!! LOL!!  I'm sure our AR/OC leader will understand ... right Susan??

Sentiment is from Papertrey Inks 2010 Anniversary set Round and Round. 

Thanks for dropping by.


I hope you have a relaxing Saturday.  We are supposed to get a ton of snow!! Yikes!!

Donelda

Friday, January 7, 2011

Lucy's Sketch Challenge #4 - Embossed Strawberries

Lucy Abrams is posting sketch challenges all week.  I can't keep up.  In fact, I did sketches 1 and 2, have skipped 3 for now and did sketch #4 because I have just received this awesome strawberry embossing template and knew it would work well with the 4th layout.  Sa dly, photographing dry embossing never seems to be an effective way of showing off how awesome it looks.  Trust me when I say it looks much better in real life!!


Sentiment is from Mini Messages, Hero Arts


Thanks for dropping by!


Donelda


Thursday, January 6, 2011

Appreciation

I number of weeks ago I had some fun playing around with squares and my corner rounder.  As well, I am working on using up some of the older papers and scraps I have. 

This is a simple card that came from that day of creating. 

Sentiment is from Through the Trees (Papertrey Ink).  The edges of all the papers are inked with Antique Linen (Ranger).

Thanks for dropping in.  Hope you are having a wonderful day.
Donelda

Wednesday, January 5, 2011

Hero Arts Challenge - Masking

I am fast becomming a Hero Arts lover!  I have picked up, won, or been given a few clear sets, clings, and wood mounted stamps.  They are great stamps!! 

the latest Hero Arts challenge is to use MASKING.  Well, that is one of my all time favorite techniques so I had to give it a go! 

On this card I used the following Hero Arts sets: Antique Engravings (butterfly), Asian Frams (flowers) and Mini Messages (sentiment) all clear stamps. 

I started out by using a home-made oval template to sponge the oval center.  Then, I stamped the butterfly.  Next, I masked the butterfly and and oval and added the flowers, stamping off to give dimension.  Finally, I colored the butterfly with Copics and stamped the sentiment. 

That was fun ... I might do another one!!
Thanks for dropping in.
Donelda

Tuesday, January 4, 2011

More Kissing Birdies

Yesterday I posted the card I made for the Clean and Simple challenge #100 over on SCS.  When I was trying out the 'kissing technique' I had actually made 5 birds.  The one you saw yesterday and then these 4 more.  Since my New Year's resolution is to use up stuff I decided to take the 4 additional birds and actually make cards with them (instead of dumping them into my 'stuff' bucket to sit for years waiting to be used).  My favorite is the Aqua Mist bird on the woodgrain panel.  All of the bits and pieces are scraps that have been sitting in my 'stuff' buckets!  That lined green frame is actually a digital element and the pink banner is from my former Secret Sister.   A pretty good start on my resolutions!

They are all pretty Clean and Simple and could have worked for the challenge.  Which one do you like best???

Thanks for dropping in.  Have a great day!  Today is my last day before heading back to work so I am planning on spending a lot of it in my craft room!  (Edited to read - guess my son has different plans, turns out we are going swimming, shopping, and then sledding!!!  Yikes, I'm going to be exhausted by tonight!)

Donelda

Monday, January 3, 2011

Clean and Simple *CAS) Challenge #100 - Kissing

I haven't played along with a Splitcoaststampers challenge in a long time.  I checked out the Clean and Simple (CAS) challenge last night (when I couldn't sleep) and saw that it was the 100th challenge. Cool!!  How could I resist??!!

The challenge was to make a CAS card using the 'kissing' technique.   It is a fun and easy technique so I visualized all night what my card could be and created this card this morning.

I started out making the bird.  The solid bird is from Bird Watching (Papertrey Ink).  I inked it up heavily using Plum Pudding ink (Papertrey Ink).  Then, I stamped onto the inked up bird using an image from Giga Guide Lines (that had no ink on it).  That removes the Plum Pudding ink from the bird in a beautiful design.  Voila, the Kissing technique.  Then I cut out the bird.

Next, I sponged an oval onto a white card base.  The ink is Spring Rain (Papertrey Ink).   Then, with the oval mask still on, I stamped a fancy swirl from Fancy Flourishes (Papertrey Ink) using more Spring Rain ink.   Then I removed the mask and added the sentiment from Around & About Sentiments in Plum Pudding ink. 

See those little half pears, they started out white ... but I added some Copic markers to them to match the color of Plum Pudding .. a bit of purple and pink on top made the perfect match.  And see how the pearls, sentiment, and bird make a visual triangle of the same color!!

So, I'm off to post this card at SCS and check out what everyone else did with the Kissing technique!  Have a great day!

Donelda

Sunday, January 2, 2011

Lucy's Challenges #1 and #2

Hi everyone!  I was so excited when I dropped in to Lucy Abrams' blog today because she has started doing sketch challenges.  Her first sketch was posted Friday HERE and then her second sketch was posted this morning HERE.  Lucy designs for Hero Arts and is an amazing Clean and Simple card maker.  I decided to play along with both sketches since they were both fantastic. 

Here is the first sketch and my take on it.  I kept pretty true to the layout.  The truth is I've been meaning to try my hand at these rosettes that have been all over blog-land these days.  When I saw the 4 items on the front of this first sketch I thought maybe I'd make 4 rosettes but once I got this first one done I realized it could be the "o" in the word LOVE and still fit the sketch. 


This is the second sketch and my take on it.  I love Jennifer McGuire's videos on using distress inks with embossing over top so I went with that technique.  I used the Cling Stamp Floral Garden from Hero Arts for the first time on htis card and I really like it.  What was I waiting for??!!  The sentiment is from Spiral Bouquet (Papertrey Ink) and is heat embossed in white over some vellum that I sponged with purple ink.  the  background is made by sponging Lavender Lace (Stampin' Up!) ink in the middle of some white cardstock and then adding Faded Jeans and Broken China (both Ranger Distress Ink) around the edges.  Finally, it is splashed with a bit of water. 


Thanks for dropping by today!  Do you enjoy sketch challenges??  If so, drop over to Lucy's blog and give her challenges a go.  I'm heading over there to see what everyone else did with these sketches!

Donelda


Ice Cream and Ribbon Scraps

This card was created to use the lovely pieces of satin ribbon scraps that I had laying around.  That is one of my New Year's resolutions .. to use up the many scraps I have.  The ribbon is from Papertrey Ink and the colors are Berry Sorbet, Aqua Mist, Lavender Moon, and Lemon Tart.  When I looked at them, they looked so yummy together, like ice cream!  So, I grabbed my ice cream cone stamp (g Studio) and colored the scoops using Aqua Mist ink, Berry Sorbet ink and a blender pen. 

The sentiment was created from my Trajan Monogram letters (Papertrey Ink).  One more generic card that I could use for a variety of occasions!!

(Note - sorry the colors are so washed out in this picture .. you can barely see the yellow ribbon!  Sheesh!!  I hope to get my photo cube lamps fixed soon but in the meantime I'm afraid you might have to suffer with some poor photo quality until that time!!  Thanks for understanding)

Thanks for dropping by my blog!! 
Donelda

Saturday, January 1, 2011

Happy New Year 2011

Yaaahoooo!!  It is 2011!  Wow, it is hard to believe that 2010 is finished and we now move in to a fresh new year.  I love the new year.  It feels like a clean slate where you can do anything you want.  I have been thinking of some New Year resolutions (other than my crafting ones which I posted yesterday) and will finalize them today as we take down our Christmas decorations and spend a fun family day together playing games, reading, and generally taking it easy! 

I got up early this morning (6:30 - waaaaay before the boys woke up) so that I could enjoy the Christmas lights in our living room one last time.  It is really one of my favorite things about the holiday season.  It is just so warm and cozy in my big chair with a big blanket over me, enjoying the twinkle of the lights.  I had been browsing a few blogs and remembered that I had downloaded this free New Years image last year (from Mo's Blog).  So I visited my craft room (first card I've made in about 4 or 5 weeks) and whipped up this little card.  He is colored in with Copics and I added a bit of sparkle with my Sukara gel pen. 

Happy New year to all of you who visit me here at my blog.  I look forward to all that the crafty New Year brings, including sharing the joy of creating with all of you!

Donelda